Frontend/JavaScript
[바닐라 자바스크립트로 SPA 만들기] 3. 라우팅
반응형
사실상 SPA 구현의 핵심이라 할 수 있는 라우팅을 추가해 보자.
라우팅 구현하기
라우팅을 위한 주요 기능은 "프레임워크 없는 프론트엔드 개발" 도서의 라우팅 부분을 참고했으며, 전반적인 틀은 앞서 구현한 컴포넌트 기반 폴더 구조에 맞추었다.
폴더 구조
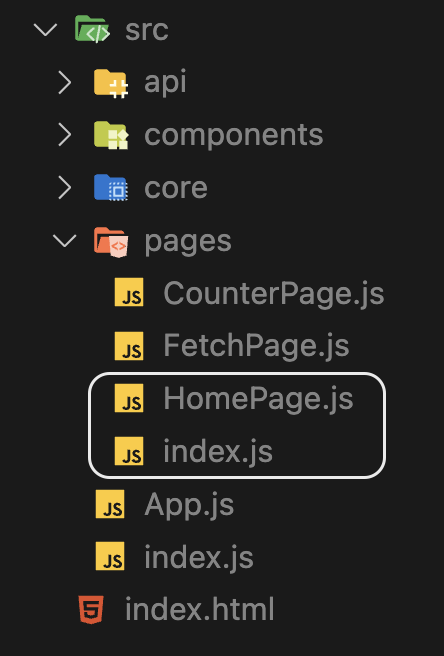
페이지 간 이동을 위해 파일을 추가했다.
- HomePage.js: 초기 접근 페이지
- index.js: pages 컴포넌트의 export 모음
src/pages/HomePage.js
- 초기 접근 시 렌더링 되는 페이지로, 기존 App 컴포넌트의 역할을 대신하는 페이지 컴포넌트이다.
- 일단은 페이지 구분 용도이기 때문에 별 내용은 없다.
import Component from '../core/Component.js';

export default class Home extends Component {
  template() {
    return `
        <h1>Home Page</h1>
    `;
  }
}
src/pages/index.js
- pages 폴더에 생성된 페이지 컴포넌트들을 모아서 export 한다.
- 라우팅 시 필요한 페이지를 매번 import 하지 않기 위한 작업으로 볼 수 있다.
import HomePage from './HomePage.js';
import CounterPage from './CounterPage.js';
import FetchPage from './FetchPage.js';

export default (main) => {
  const home = () => new HomePage(main);
  const counter = () => new CounterPage(main);
  const fetch = () => new FetchPage(main);

  return {
    home,
    counter,
    fetch,
  };
};
src/App.js
엔트리 포인트인 App 컴포넌트에서 라우팅을 추가할 것이며, 참고 코드는 여기서 확인할 수 있다.
1. 페이지 이동 UI 생성
- a 태그로 페이지 이동 헤더를 만든다.
- 프래그먼트 식별자(
#)를 통해 URL을 구분한다.
  template() {
    return `
    <header>
      <a href="#/">Home</a>
      <a href="#/counter">Counter</a>
      <a href="#/fetch">Fetch</a>
    </header>
    <main></main>
    `;
  }
2. 라우터 레지스트리
- 존재하는 페이지를 관리하기 위한 저장소를 생성한다.
- App의 state는 최상위 상태이기 때문에 routes 생성의 적합한 위치라고 생각했다.
  setup() {
    this.$state = {
      routes: [],
    };
  }
3. 라우터에 페이지 추가
- 페이지들을
{ fragment: 주소, component: 컴포넌트 }의 형태로routes에 넣는다. - App 컴포넌트 렌더링 시 최초 한 번만 설정하면 되므로, mounted에서 작업한다.
  import createPages from './pages/index.js';

  mounted() {
    const $main = this.$target.querySelector('main');
    const pages = createPages($main);

    //라우트 페이지 설정
    this.$state.routes.push({ fragment: '#/', component: pages.home });
    this.$state.routes.push({
      fragment: '#/counter',
      component: pages.counter,
    });
    this.$state.routes.push({ fragment: '#/fetch', component: pages.fetch });
  }
4. URL 변경 이벤트 추가
hashchange이벤트를 통해 URL 변경을 감지할 수 있다.- 현재 URL의 위치를 파악하고 해당하는 컴포넌트를 렌더링 하는
checkRoutes함수를 생성한다. - 존재하지 않는 URL로 이동이 발생하면 홈으로 리다이렉트 한다.
  mounted() {
    ...

    //현재 URL 체크
    const checkRoutes = () => {
      const currentRoute = this.$state.routes.find((route) => {
        return route.fragment === window.location.hash;
      });

      if (!currentRoute) {
        //redirect to home
        window.location.href = './#';
        this.$state.routes[0].component();
        return;
      }

      currentRoute.component();
    };

    //URL 변경 이벤트
    window.addEventListener('hashchange', checkRoutes);

    if (!window.location.hash) {
      window.location.hash = '#/';
    }
  }
5. 초기 렌더링
- 초기 렌더링을 위해
checkRoutes를 한 번 호출해야 한다.
  mounted() {
    ...

    checkRoutes();
  }
최종 코드
  mounted() {
    const $main = this.$target.querySelector('main');
    const pages = createPages($main);

    //라우트 페이지 설정
    this.$state.routes.push({ fragment: '#/', component: pages.home });
    this.$state.routes.push({
      fragment: '#/counter',
      component: pages.counter,
    });
    this.$state.routes.push({ fragment: '#/fetch', component: pages.fetch });

    //현재 URL 체크
    const checkRoutes = () => {
      const currentRoute = this.$state.routes.find((route) => {
        return route.fragment === window.location.hash;
      });

      if (!currentRoute) {
        //redirect to home
        window.location.href = './#';
        this.$state.routes[0].component();
        return;
      }

      currentRoute.component();
    };

    //URL 변경 이벤트
    window.addEventListener('hashchange', checkRoutes);

    if (!window.location.hash) {
      window.location.hash = '#/';
    }

    //초기 렌더링
    checkRoutes();
  }
렌더링 결과
URL 변경과 렌더링이 잘 동작하는 것을 확인할 수 있다.
라우팅 파일 분리하기
잘 동작하지만, App 컴포넌트의 mounted에서 관리하는 라우팅 코드가 깔끔하지 않다. 라우팅 파일을 분리해 보자.
src/Router.js
- src 하위에 라우팅을 위한 파일을 하나 생성한다.
- App 컴포넌트에서 작성한 라우팅 관련 코드를 Router 클래스의 메서드로 추상화한다.
addRoute: 페이지 추가checkRoutes: 현재 URL에 대응하는 컴포넌트 렌더링 (hashchange이벤트 핸들러)start: 라우터 동작의 초기 설정
import Component from './core/Component.js';

export default class Router extends Component {
  setup() {
    this.$state = {
      routes: [],
    };
  }

  addRoute(fragment, component) {
    this.$state.routes.push({ fragment, component });
  }

  checkRoutes() {
    const currentRoute = this.$state.routes.find((route) => {
      return route.fragment === window.location.hash;
    });

    if (!currentRoute) {
      window.location.href = './#';
      this.$state.routes[0].component();
      return;
    }

    currentRoute.component();
  }

  start() {
    window.addEventListener('hashchange', () => this.checkRoutes());

    if (!window.location.hash) {
      window.location.hash = '#/';
    }

    this.checkRoutes();
  }
}
src/App.js
- 이제 App 컴포넌트에서는 라우터 내부 동작을 알 필요가 없어졌다.
- Router의
addRoute메서드를 통해 라우팅 할 페이지를 설정하고start만 호출하면 된다!
import Router from './Router.js';
import Component from './core/Component.js';
import createPages from './pages/index.js';

export default class App extends Component {
  template() {
    return `
    <header>
      <a href="#/">Home</a>
      <a href="#/counter">Counter</a>
      <a href="#/fetch">Fetch</a>
    </header>
    <main></main>
    `;
  }

  mounted() {
    const $main = this.$target.querySelector('main');
    const pages = createPages($main);

    const router = new Router($main);
    router.addRoute('#/', pages.home);
    router.addRoute('#/counter', pages.counter);
    router.addRoute('#/fetch', pages.fetch);
    router.start();
  }
}
Reference
반응형
'Frontend > JavaScript' 카테고리의 다른 글
| [바닐라 자바스크립트로 SPA 만들기] 2. 비동기 처리 (0) | 2023.06.25 |
|---|---|
| [바닐라 자바스크립트로 SPA 만들기] 1. 컴포넌트 만들기 (0) | 2023.06.24 |
| [JavaScript] 코어 자바스크립트 7장 - 클래스 (0) | 2023.06.08 |
| [JavaScript] 코어 자바스크립트 6장 - 프로토타입 (0) | 2023.06.07 |
| [JavaScript] 코어 자바스크립트 5장 - 클로저 (0) | 2023.06.05 |


